Vetro Media Dev WIKI Training Manual
- latest update: 02/09/2024
- by: Nick Wilson
- email: Nick Wilson
I've built this training manual to assist you with day to day basic edits on Vetro Websites. Its also for assistance in additional services like using Everlytics, General Communication and collaboration, and lastly a general "Wiki" to guide you through the "Do's & Dont's" at Vetro. Please use the training doc as a guide and step by step reference.
Also - in the nature of Dev, this document, being a "Wiki" can gow, so please add to it as you see fit with any useful and relevant information.
*** Please note that this training manual is not responsive and is not intended for mobile use at all. For Desktop use only. ***
General Information
This covers Trello Etiquette, best practice in terms of managing trello board and ensuring that all team members, Stakeholders and the rest of the business are 100% aware of any tasks status at any time.
It also covers best practice in terms of communication on Trello | Chase management, notes and timekeeping.
Lastly, we cover monitoring email and teams as well as best practice that HOD's and the standard entire team expect.
Trello:
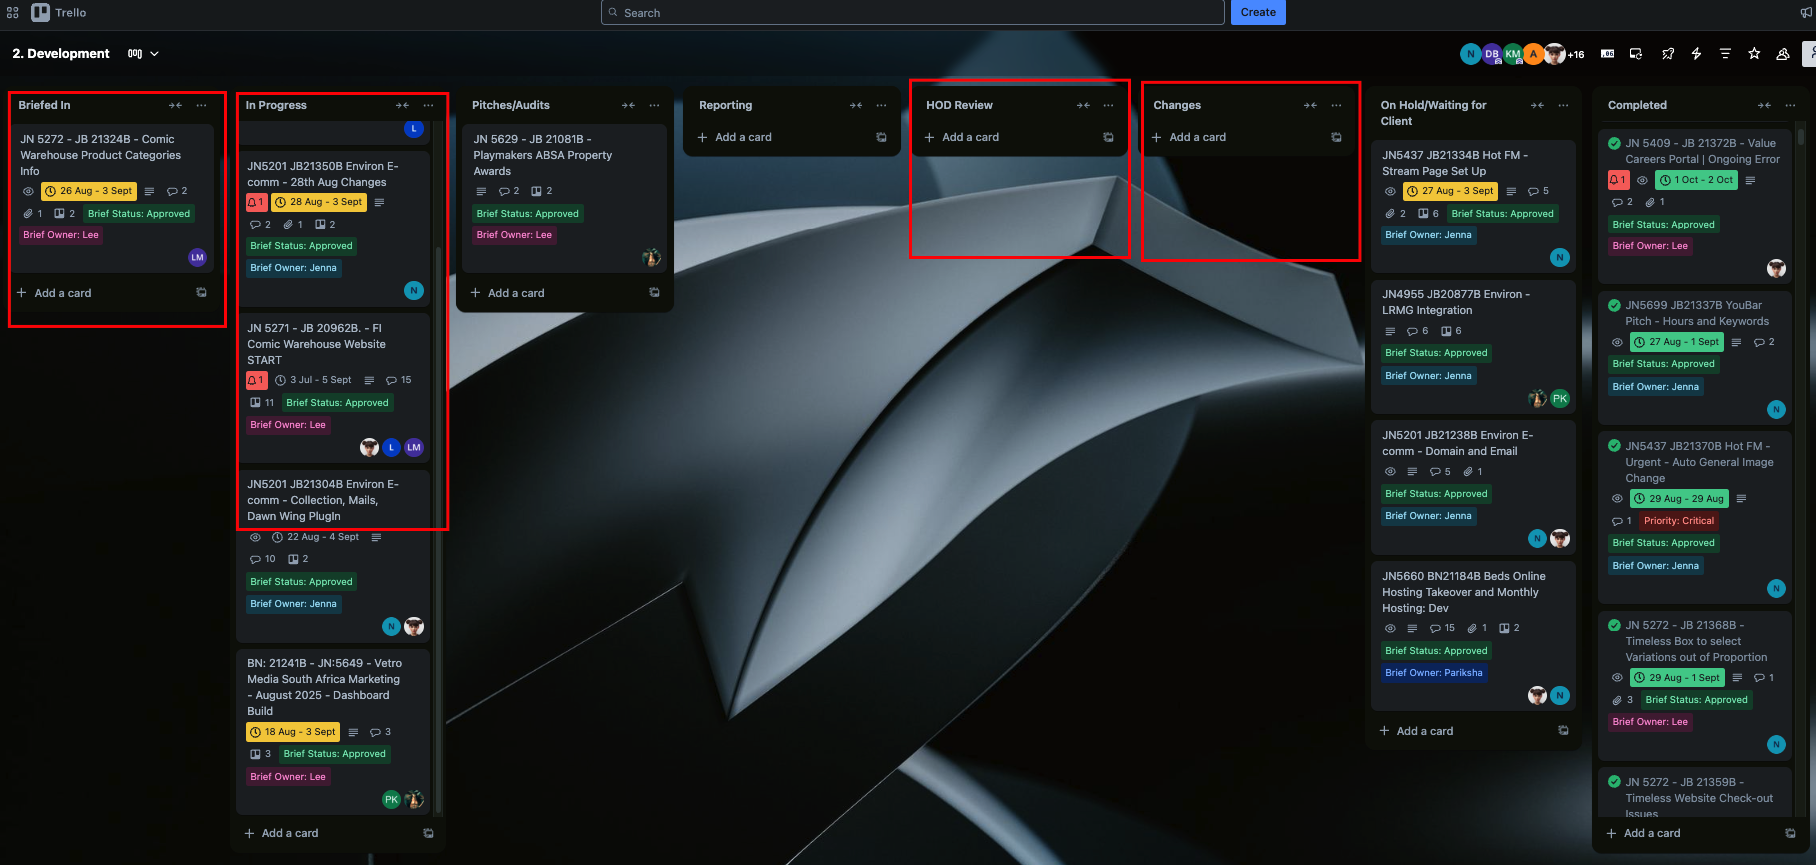
- When a brief arrives in the "Briefed in Section" with your name tagged, It needs to be actioned immediately
- When a critical brief with your name tagged comes in, it takes priority over ALL other briefs
- You need to Prioritize your workload in such a way so that all briefs due first are done on time and so on with briefs due later.
- Once you have completed a brief, you drag it into the "HOD Review" Section
- If you see you are not going to make the deadline by the assigned time, your HOD needs to be notified by 14:00 PM the latest so that stakeholders expectations can be managed.
- Upon review your HOD will either approve and mark the brief complete or it will be mnoved to the "changes" section in which case more work will need to be done on it.
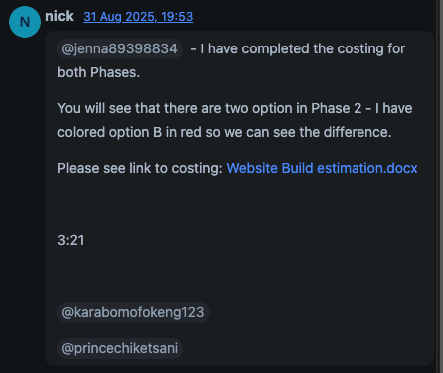
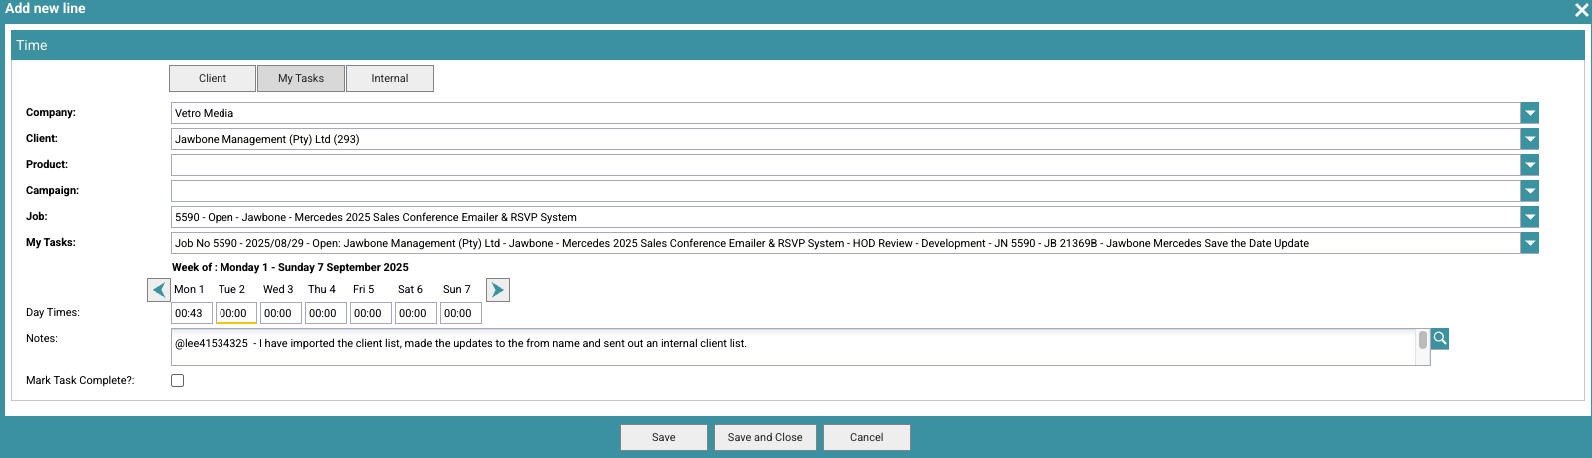
- Notes have to be made on Trello constantly, and throughout each work-sprint you do on any given task - in doing so you need to tag the following people on each note:
- The A.M.
- Your HOD
- Traffic Manager
- Ops Manager
N.B. - The note must include a detailed description of what was done, any blockers as well as proposed solution and timeline. It must also include a link if applicable, and the time spent on the brief.
See example below:
- After each work-sprint you take your commwent from your note and copy to chase - thisd must be done as each sprint is completed before moving onto the next task.
See example below:
PLEASE NOTE: The above process/protocol is super important, and your ability to follow this correctly will reflect on your KPI's
This is just to notify you of the importance of an email signature - email standards etc
Please ensure that your email signature is:
- Set up in your email - not having this reflects poorly on the dept and the company
- Is set up to be inserted on replies and forwards as well as new mails.
Lastly, please ensure that the Email body styling is Calibri and is 10.5pt in font size.
It is important to get these right - because anyone reading the email will see the unifomred consistency that they would appreciate on their branded work
It is important to have your signature set up so staff members can contact you if necessary.
This section houses a list of servers - what they're for, and their links - feel free to add to this if and when needed.
PLEASE NOTE: Passwords are not and will not be stored on this document - this is for security - they will be shared with you and you must save them in your lastPass Web App
General Information
This explains the expected protocol for tems and email in terms of monitoring, communication & turnaround - this refelcts strongly on the department & business and will be taken into consideration for KPI's
- Teams & Email (Outlook) need to be monitored constantly - this way we do not get unnecessary delays in responding to emails or answering teams chats/conversations
- Always ensure your Teams status Badge is set to Available during working hours - see example below:

- If you step away from your workstation, please ensure that you chnage your status to "Away" or "BRB" - this tells people that you are away and they dont try to call you while you are away.
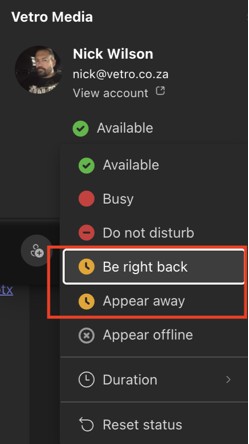
- If you see someone is on red status (Busy or Do not disturb/presenting) it usually signifies that they are in a meeting - please dont try and call them - it is distracting and can disrupt the meeting - rather send them a message and they will call you back when they are done.

- When you go on leave, please schedule your out of office - this alerts anyone sending you a message that you are o leave, and advised them not to expect a response from you during your leave period. Please ensure that your out of office message caters for internal recipients as well as external recipients throughout the entire period - it must also detail your leave duration and who they can contact in your ansence.
- Out of the office or working from home - when this happens, please let the company know that you are working from home by sending an email to teamvetro@vetro.co.za and advising of the day/s you will be WFH or OOO - and that you will be available online.
This section explains the everlytics process, and also details how to set up a tenant (Process) and structure a mail campaign - please ensure that this is followed exactly to the letter - deviating in the slightest will result in service failure, and there is little margin for error in Mail sending Campaigns.
Process:
- Initial Tenant Setup (24–48 Hours)
- Trigger: AM informs Development that a new client/stakeholder mailer is required.
- Everlytics Client Service team will create the tenant (no longer through the dashboard).
- Setup includes:
- DNS records
- Adequate and detailed client information (Tenant name, domain name, contact person, etc.)
- Important: No sending (test or live) will occur during this phase until setup is complete.
- Content & Creative Preparation
- Client provides the AM with:
- Final artwork
- Mailer details (subject line, description, inbox preview text, from name)
- Internal test sending list
- AM forwards all details to Development.
- Mailer Creation & Internal Testing
- Development creates the mailer in Everlytics.
- Internal test mailer is sent to AM and internal stakeholders.
- AM coordinates feedback and obtains client approval for the test mailer.
- Live Send Preparation & Execution
- Client provides final live send database and confirms the send date.
- Development schedules the send.
- No further changes will be accepted after scheduling — any changes after this point will require re-costing.
- Interdepartmental Collaboration on Trello
- A Trello card will be created for each mailer project and must include:
- Project scope and timelines.
- Assigned AM and Development team members.
- Tenant setup status.
- Content and creative files.
- QA checklist for test send.
- Approval record for live send.
- All updates, approvals, and final closure will be documented in Trello.
Step-by-Step Workflow:
- AM creates Trello card and assigns to Development with client details and requirements.
- Development requests tenant creation from Everlytics Client Service team.
- Tenant setup completed (DNS records + client info) – update Trello.
- Client provides artwork and mailer details to AM → AM forwards to Development.
- Development builds mailer → sends internal test mailer.
- AM coordinates client approval for test mailer.
- Client provides live send database + confirms date. (no changes beyond this point without re-costing).
- Development schedules live send
- Both departments mark project as complete in Trello.
This new process ensures that all stakeholders have realistic expectations, setup time is accounted for, and both departments can collaborate effectively to deliver professional, timely mailers.
Tenant & Campaign Set-up
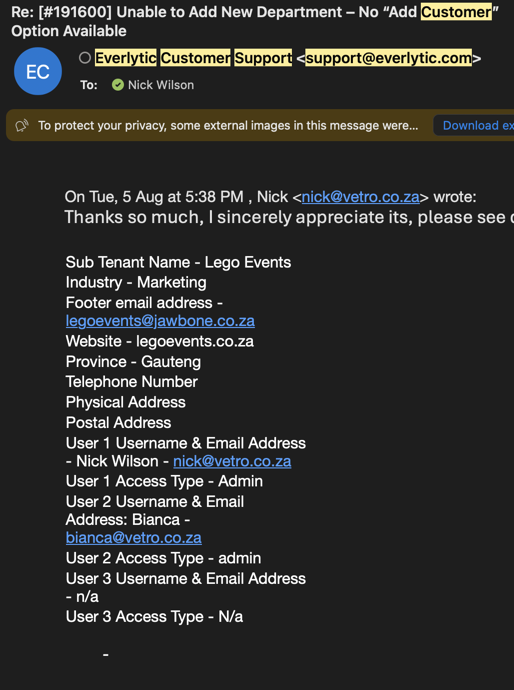
- Initially you will need to send mail to support@everlytic.com and request from them to create a new tenant for a new client as you wish to send a new campaign.
- They will respond asking for some details, please ensure that you get these from the A.M
- Please see below example of what informatio they will request from you
- You will be asked to sign a form - please forward this to me for signing - I will sign and send back to you
- Send this back to them - they will then proceed in creating the tenant with all the relevant information - as mentioned above , this process can take up to 48 hours to complete
- Thereafter , you can take the artwork from client and slice into html in photoshop
- Once the mailer is complete in html, add to a zipped folder, then proceed with setting up Campaign as follows:
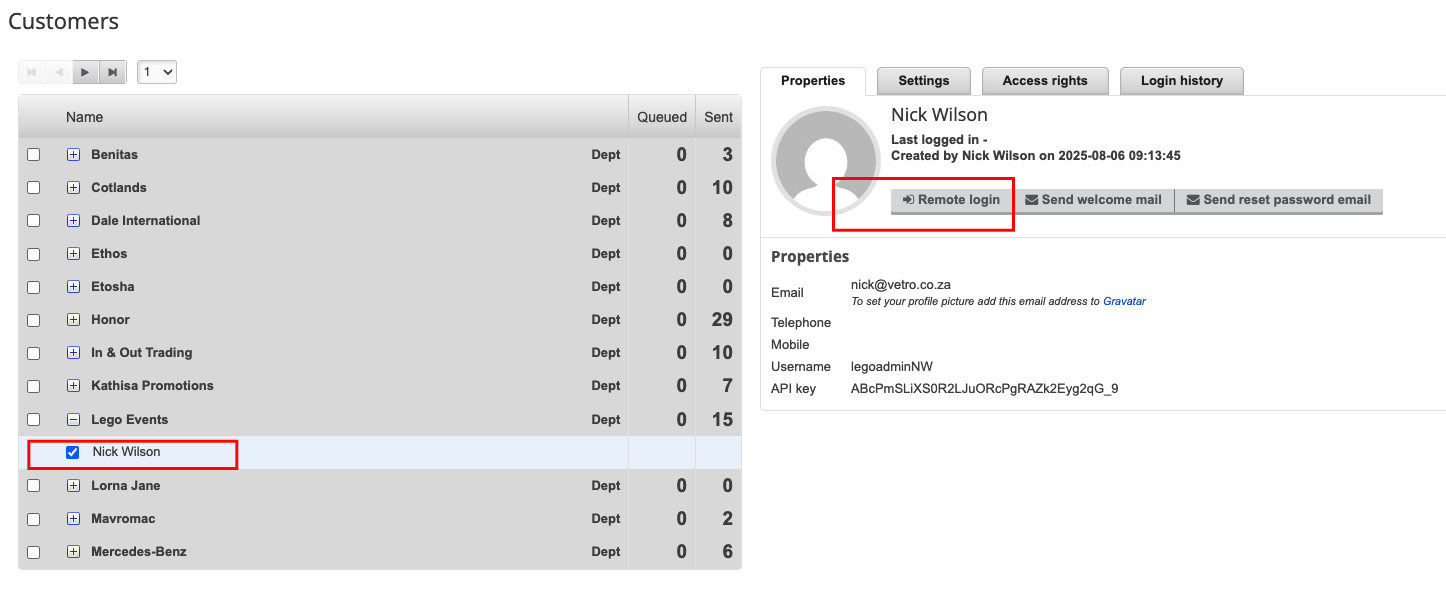
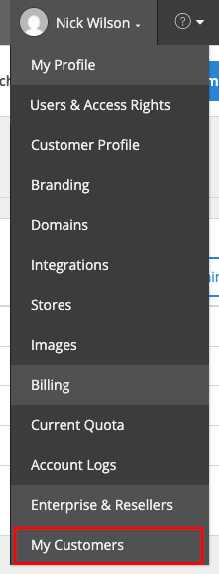
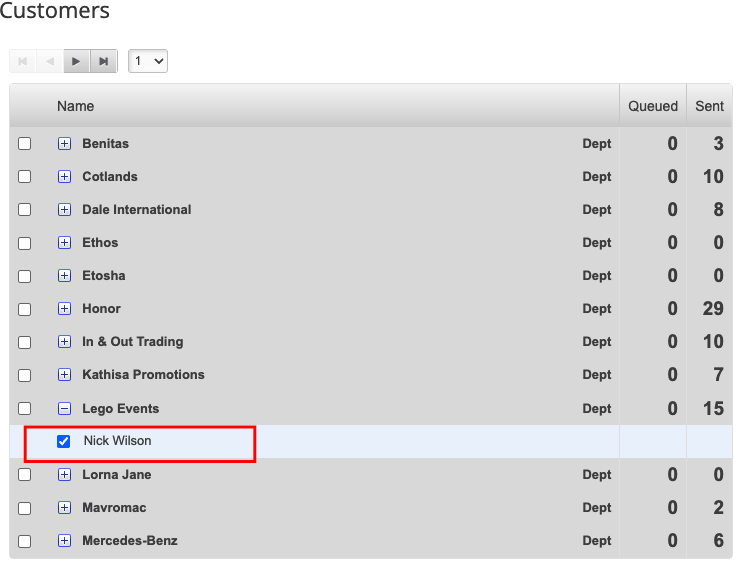
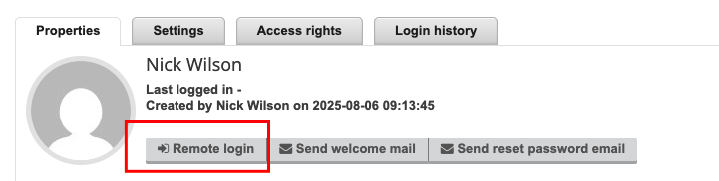
- First, click on your tenants name and proceed to remote login: Hover over your profile name > My customers > Select tenant name and expand > select checkbox and click tenant account holder name > Click remote Login
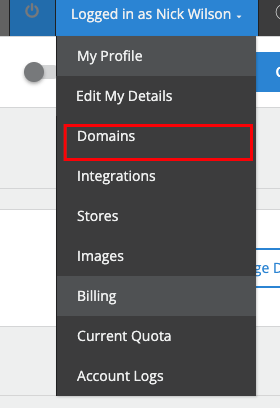
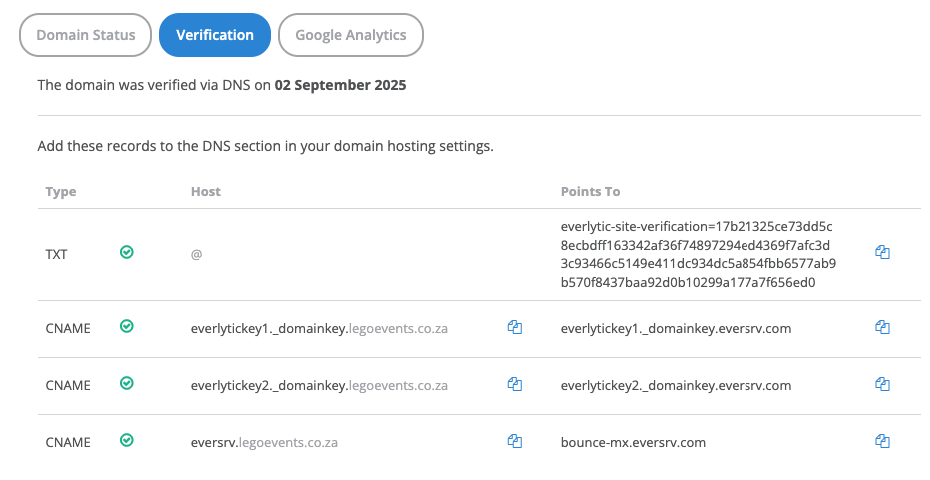
- Hover over logged in profile name and add domain and follow prompts

- Then click on verification, and you will see a pop up with a list of DNS records to add to the domains DNS - this becomes tricky if we do not host the domain that the mailer will be sent from - if not then the records need to be supplie to client so that they can have them added - THE MAILER CANNOT BE SENT OF THIS RECORDS ARE NOT ADDED
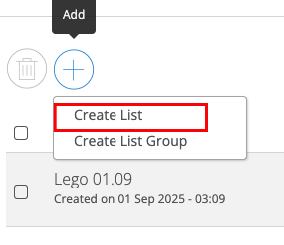
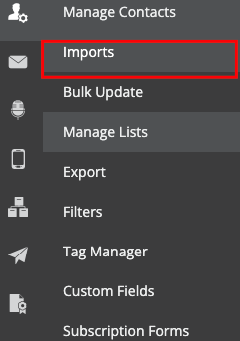
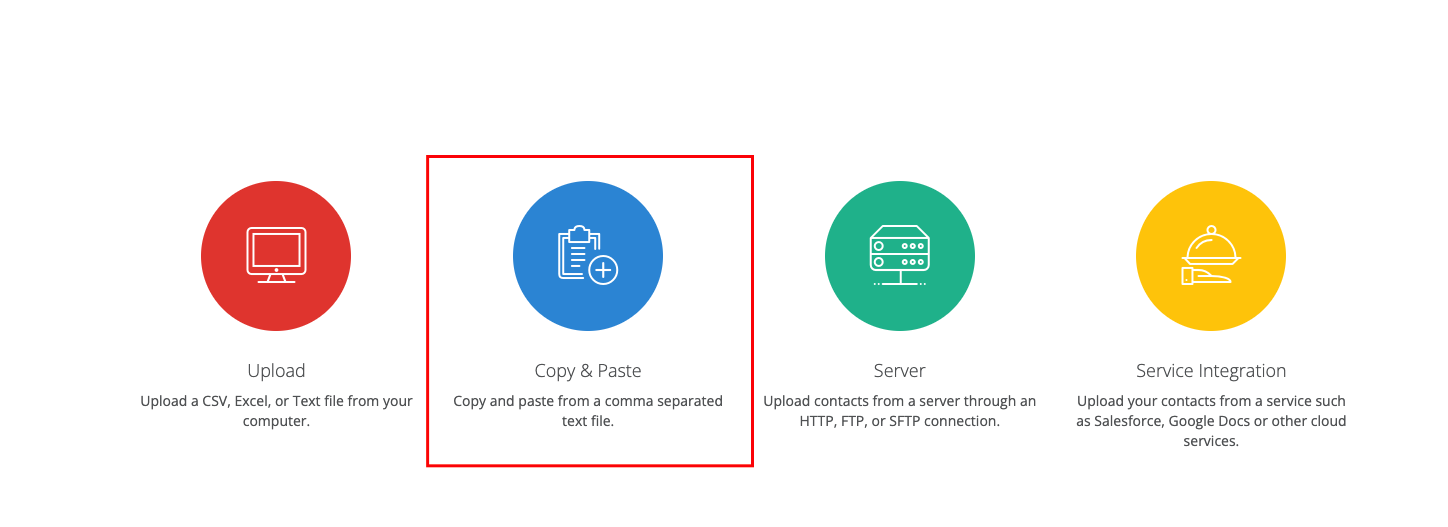
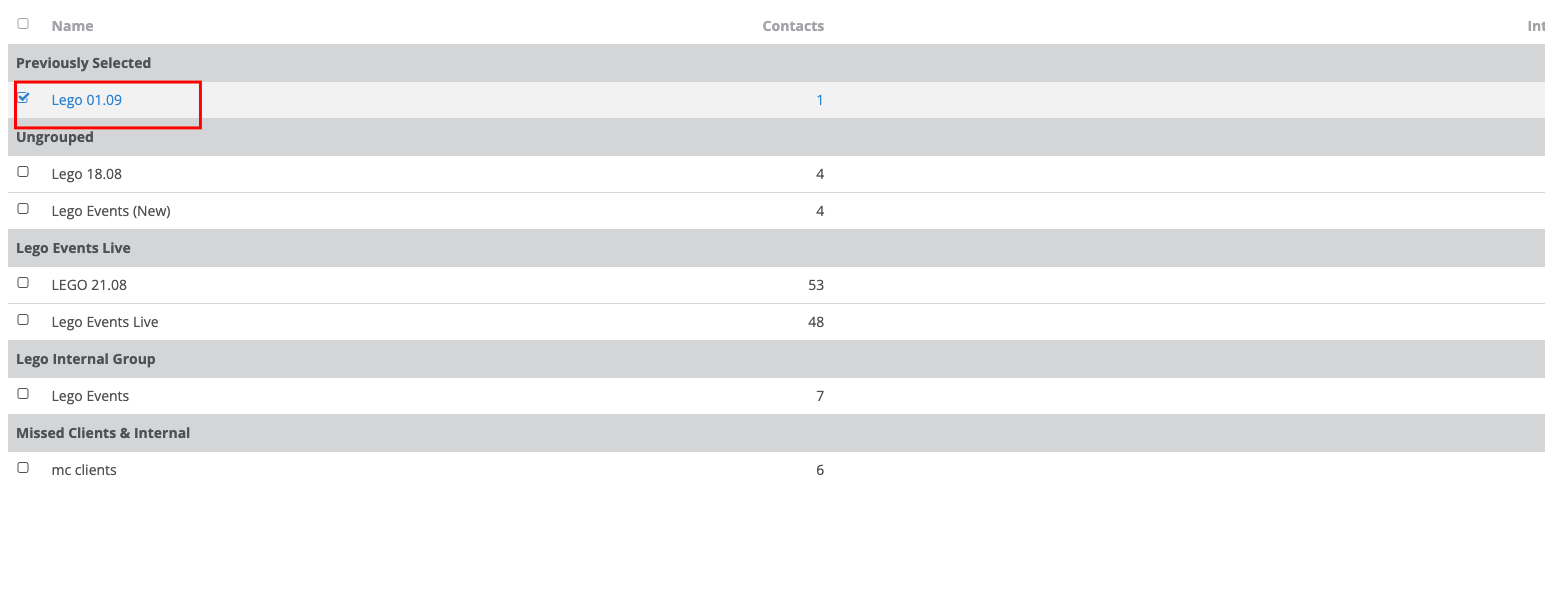
- Once that is done, please proceed to the left hand toolbar and create a list Group


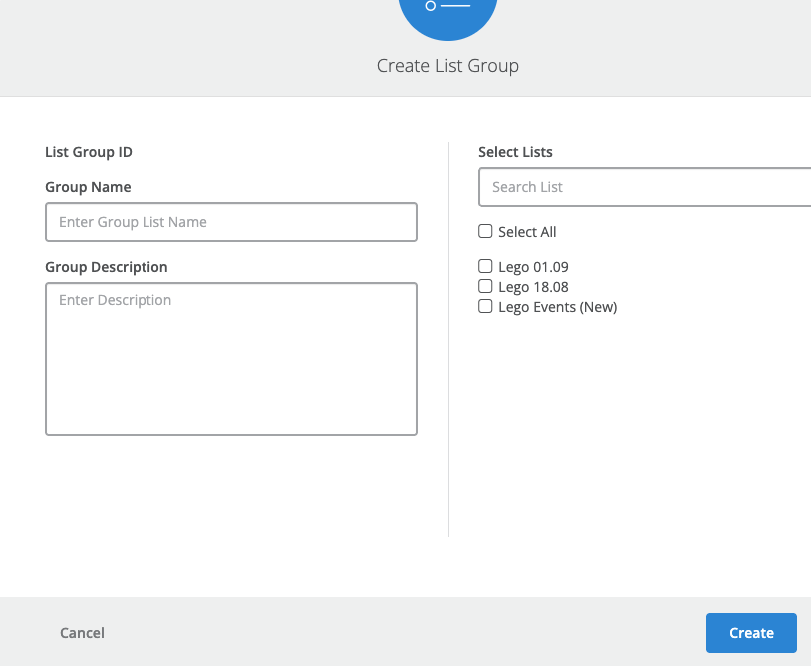
- After that is done, please create a list to send from
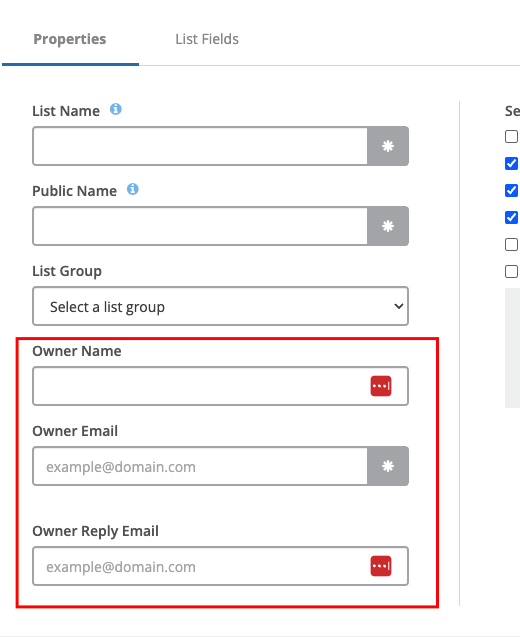
- Please complete the following information - for the section marked in red, please ensure you add the clients name and email, if you use yours, you will be contacted for any problems during the send - this needs to be client and not you.
- After that, please import your contacts - easiest/cleanest method is copy and paste - you can manullay type the names in or copy and paste from a notepad/doc
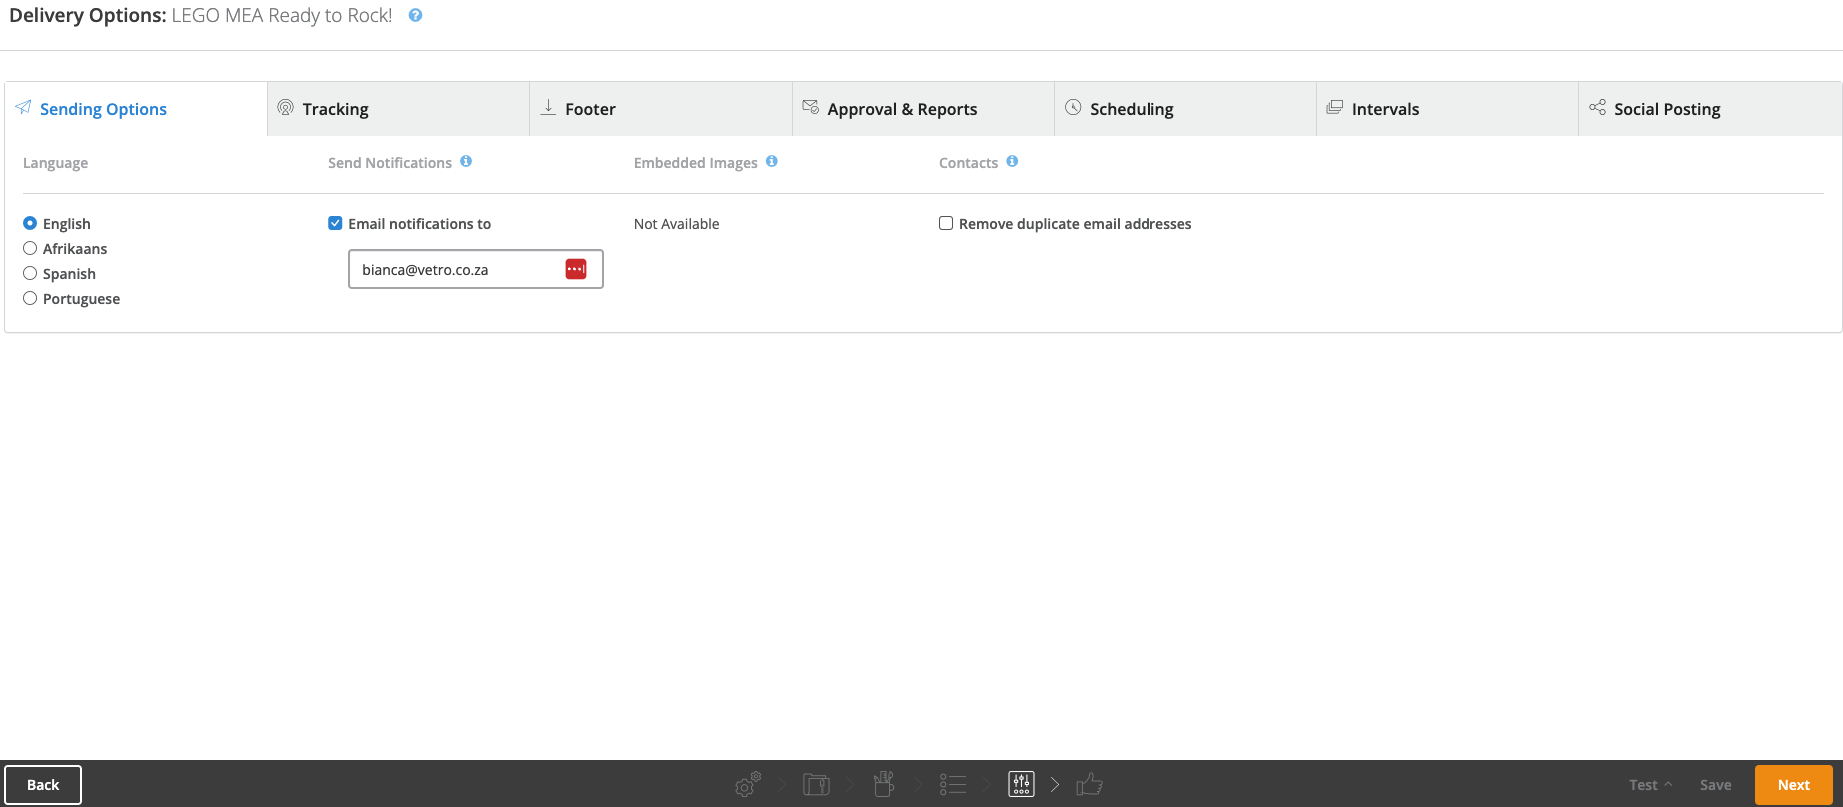
- Once you are done, please proceed to click email
- Then enter your emails details in the spaces provided
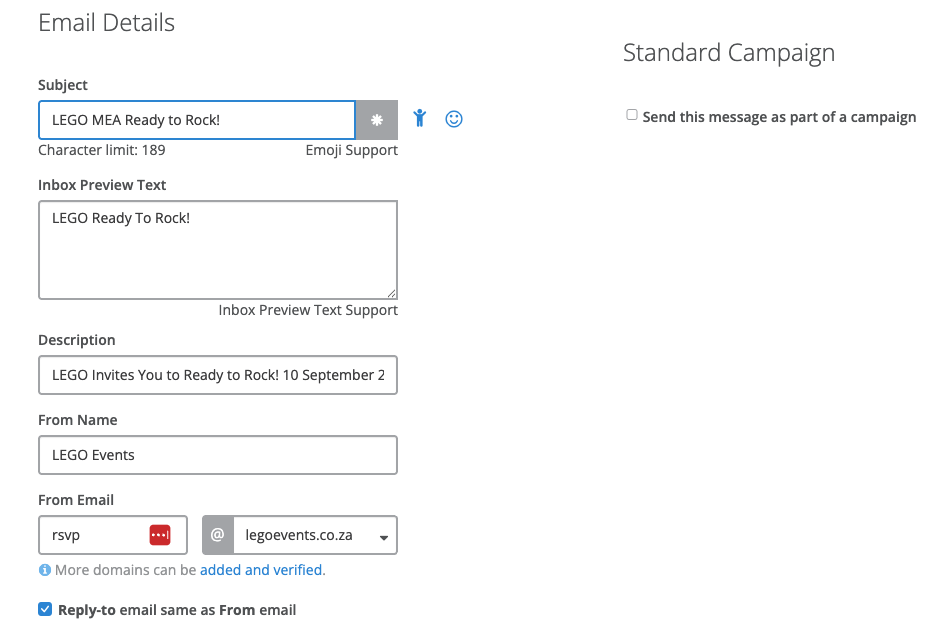
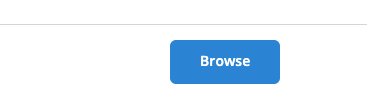
- Upload your zipped folder by clicking here
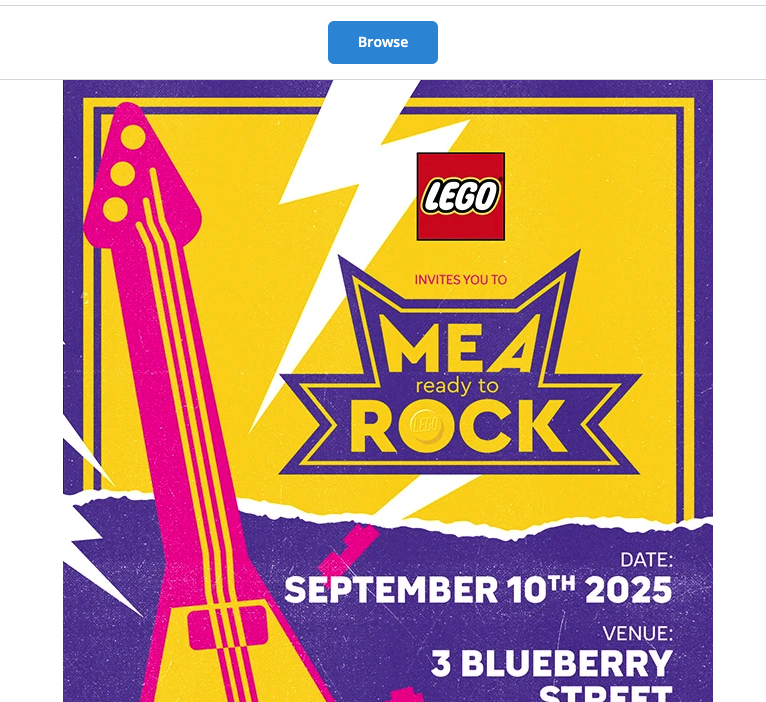
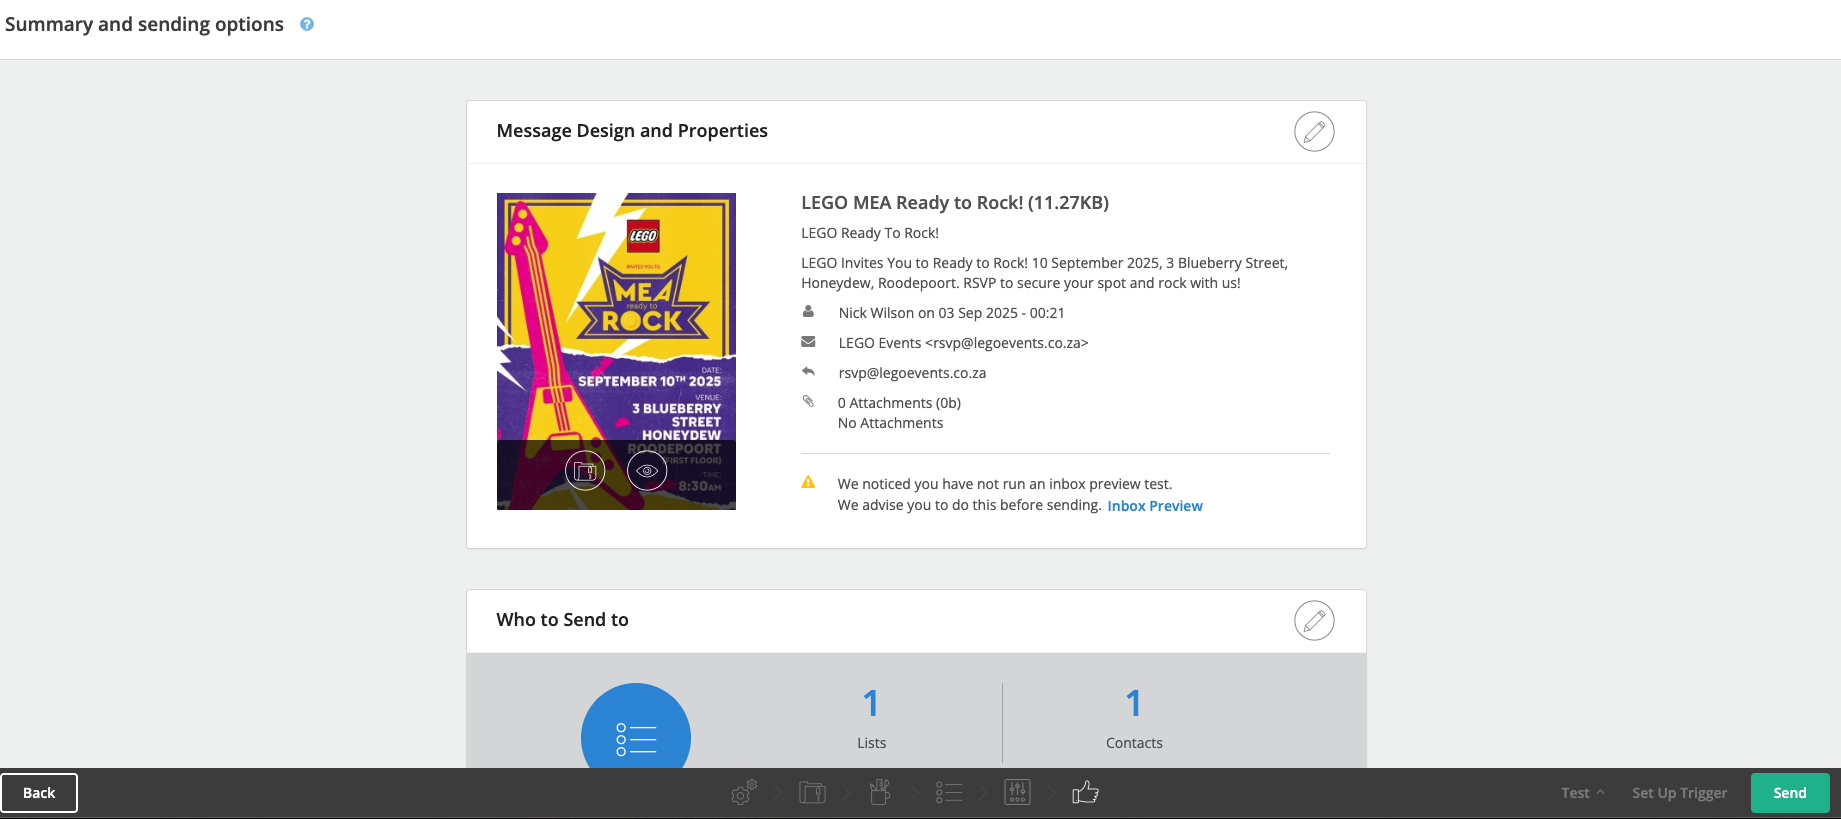
- Click Next - on this screen you can preview what the mailer will look like by hovering here
- Make any adjustments you need in the source code - the mail has to look perfect on preview - failing to check this will result in unnecessary reverts
- Select your desired list (the one you created) and click Next
- Click Next again
- On ths page you ca click send - it will then bring you to your dashboard. - YOun may need to repeat the process throughout the different stages of approval: Internal > Immediate client > Client INternal, and finally client databse send list
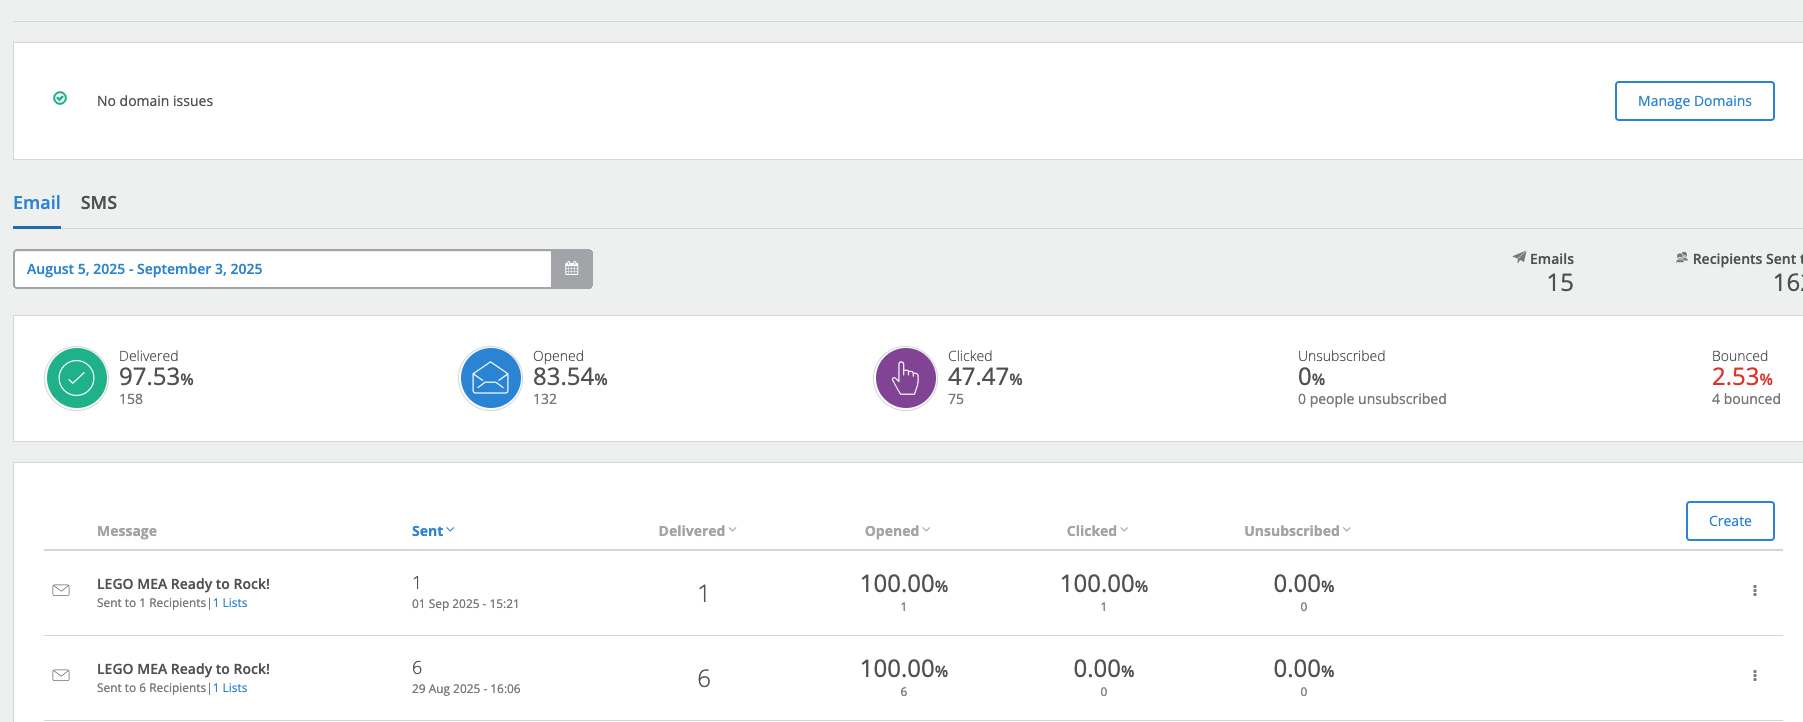
- The last thing you need to know - client would like reporting on their send - this can be seen when loggin in to your tenant - it will bring you to your reporting dashboard by default - will look something like this: